CFLsurf.com
Central Florida Surf Forecast and Reports


CFLsurf Home Page
|| About this Site || Photo Galleries || Surf the Web || Return to Repair Series Page

Part 1 of Ross's Famous Surfboard Repair Series

Broken Board Repair 101 - The Basics

This page will guide you step by step through the process of repairing your broken surfboard. Coupled with the other webpages of Ross's Famous Surfboard Repair Series, this presentation is believed to provide the most comprehensive coverage of surfboard repair that you can find on the Internet.

There are many minor variations to the process of fixing a broken surfboard since each break will be a little different. However, this guide is aimed at the basics and will walk you through the most important steps, making use of simple tools and materials that are readily available from local shops or from the following on-line suppliers: U.S. Composites or Fiberglass Supply.

Since the repair process can be messy and since you may need to leave the board set up for at least several overnight curing sessions, you will need a sheltered work area. The repair can be done totally by hand; however, a small power sander saves a lot of work and time. Also, for repairing this board I used four 6-inch c-clamps ($10 each) to align the board. In the past I have always used masking tape. The c-clamps worked very well and can be used for other projects as well as other broken surfboards. Others items you need include: mixing cups, four 18-inch long 1" by 3" wood splints, saw horses or similar supports for the board while you work on it, paint thinner, acetone, alcohol, fiberglass cloth (4 oz for short boards, 6 oz for longboards), epoxy and/or polyester resin with catalyst, micro-balloons, masking tape, assorted sand paper, and a can of clear coat spray paint. The websites mentioned above for fiberglass supplies discuss materials, so I don't go into that very much on this page. However, be sure to use fiberglass cloth and resins that are intended for surfboards. You don't need the expensive S-glass cloth, but unless you intend to paint over the repair, you will want to use clear surfboard resin. Don't use that dark brown resin that is sold at auto-parts and hardware stores even if you are going to paint it..


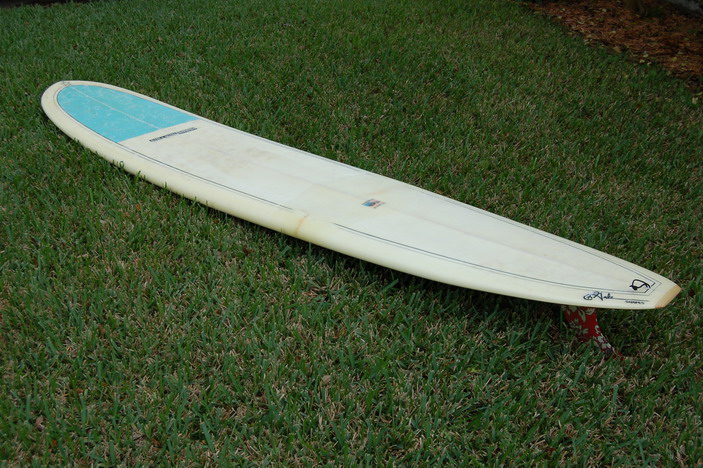
The above photo shows the board featured on this page the day it arrived new in July, 2005. We'll use this picture for a comparison with what it looks like after the repair is completed. This is a custom made 9'6" epoxy longboard with two layers of cloth (6 oz) on the bottom and three layers of cloth on the deck (two 6 oz and one 4 oz). When new, it weighted 14.0 pounds without the fins.


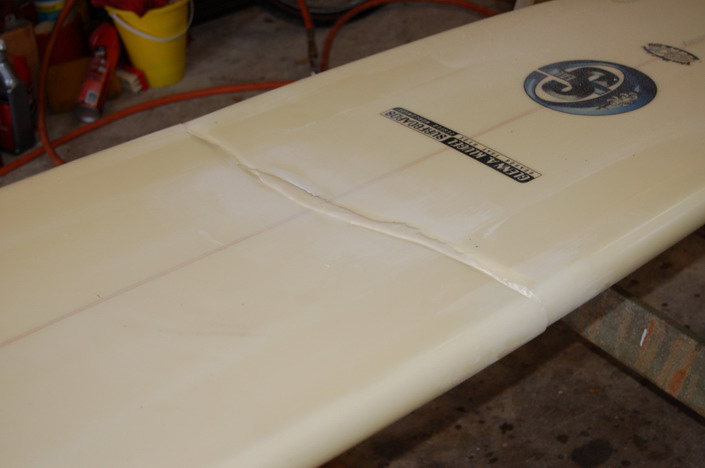
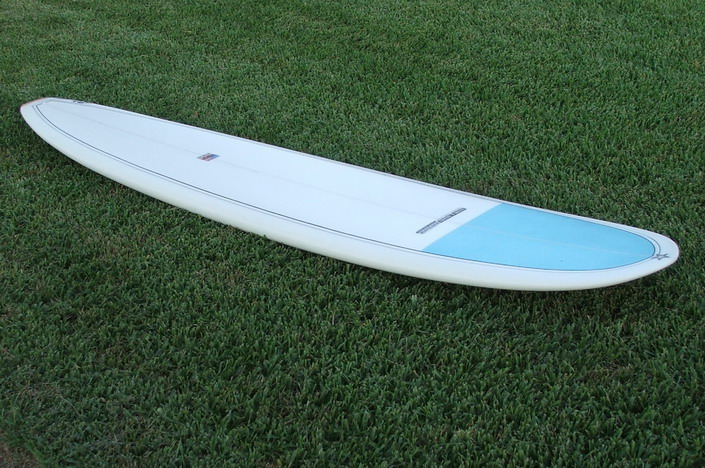
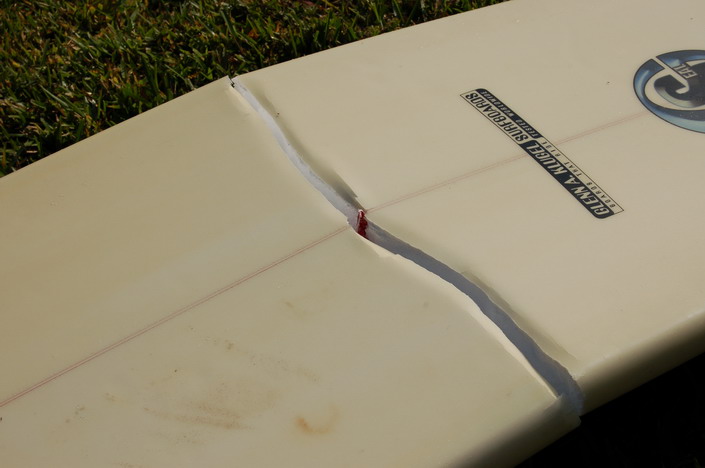
Here it is again on November 8, 2006 after getting pounded in the high tide shore break. This is a very clean break. Sometimes a large section of the laminate gets pealed off with the break. Since epoxy is more flexible than polyester, the damage to this board was confined to the immediate area of the break. The top deck remained intact except for torn rails.


The first step is to allow the board to thoroughly dry out. Secure it such that the break is slightly open and exposed to the air, facing downward so any water can drip out. A fan directed toward the open break speeds up the drying process. Don't skip this step. If the board is soaked, the dry out period can easily take a week or longer.

After the board has thoroughly dried, clean away wax and grime from an area at least 15 inches fore and aft of the break, on both the deck and bottom of the surfboard. Handle the board with care if the two sections are still attached so that the damage is not aggravated. It may be best to go ahead and cut the board into two separated pieces if the remaining attached decking is ripped away from the foam core. In this case it wasn't. In the picture above, the board is supported by a pair of two-by-fours suspended between the saw horses.

After setting the board in the sun and scrapping off most of the wax, cloth rags soaked with mineral spirits work well for final wax removal. Follow up the mineral spirits with a good rub down using alcohol, and then do a final buffing with clean dry rags to remove any remaining residue. Although acetone will also remove wax, acetone is a very effective paint remover and may strip off any top coating or surface pin striping from the board. Thus, I suggest you avoid using acetone except perhaps in small areas that you are going to be glassing over. Take your time and do a good job. The best repair in the world isn't going to do much good if it separates from the board due to poor cleaning.


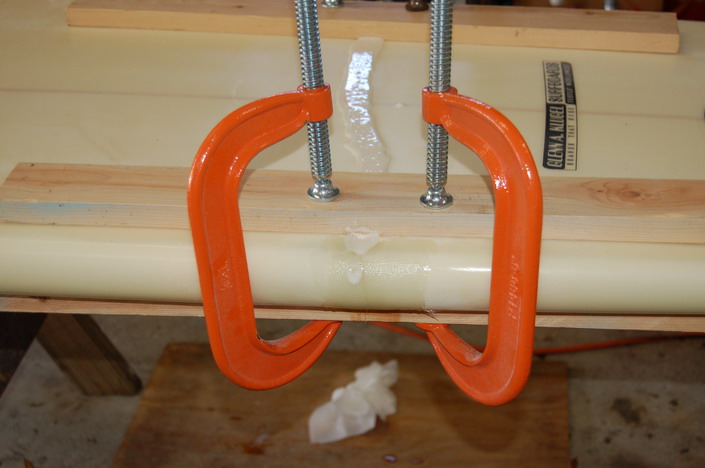
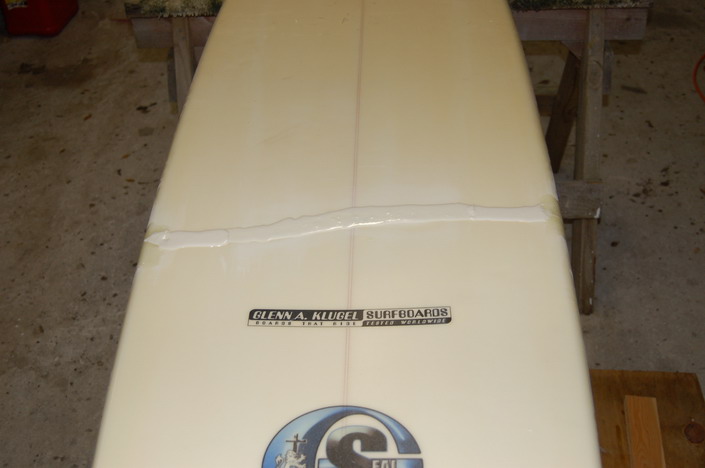
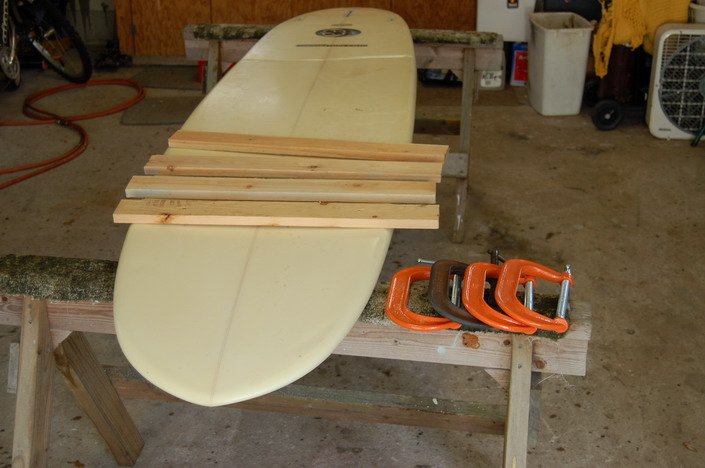
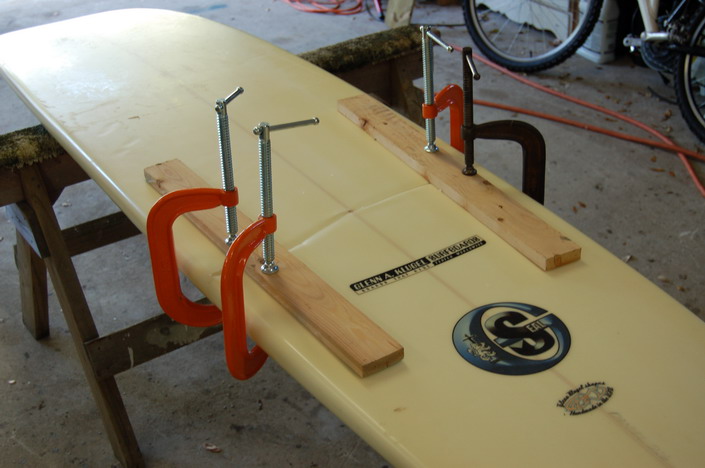
The next step is the most important and often the most difficult - alignment. Perfect alignment is CRITICAL. There are several ways to do this. In the past I always used masking tape to attach four wood splints. This time I decided to try clamps. The clamps should be placed close to the break to avoid misalignment due to the curvature of the board. Also, use wood splints on both the deck and bottom so you don't damage the board. For this break, I had to trim some of the broken laminate and stringer in order to get good alignment. Even after trimming, it took the force of the clamps to pull up the rails so that they aligned correctly. Be careful not to over tighten the clamps and crush the board. Take your time and get the alignment right.

I positioned the clamps slightly out from the edge of the rails so I could sight down the rails to check the alignment. In my opinion, this is the only challenging step to fixing a broken board. The rest is just work (but lots of it). Achieving perfect alignment can sometimes be difficult, particularly if there is a lot of damage in the break area. For this board, without the clamps I probably would have cut the top deck to fully separate the two sections since the deck was causing difficulty in the alignment that I could not correct by hand. The clamps made the alignment easy.


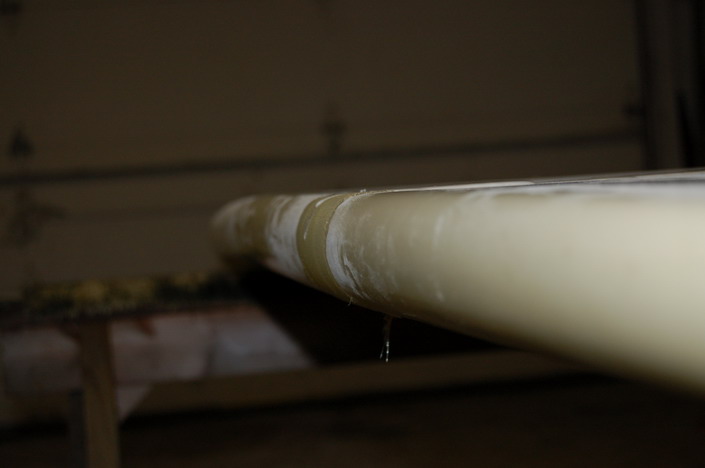
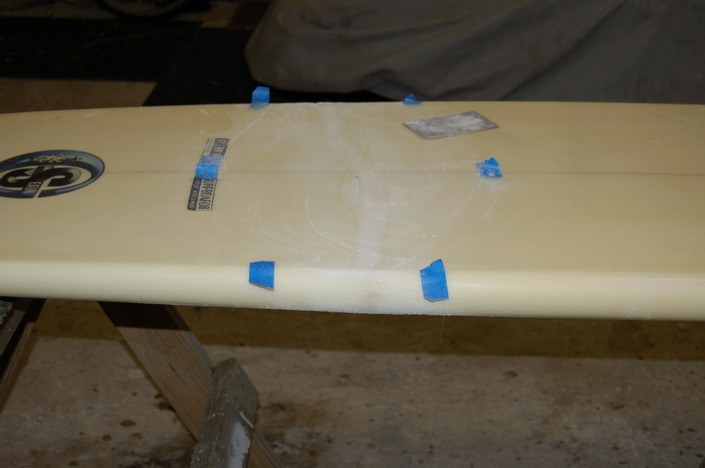
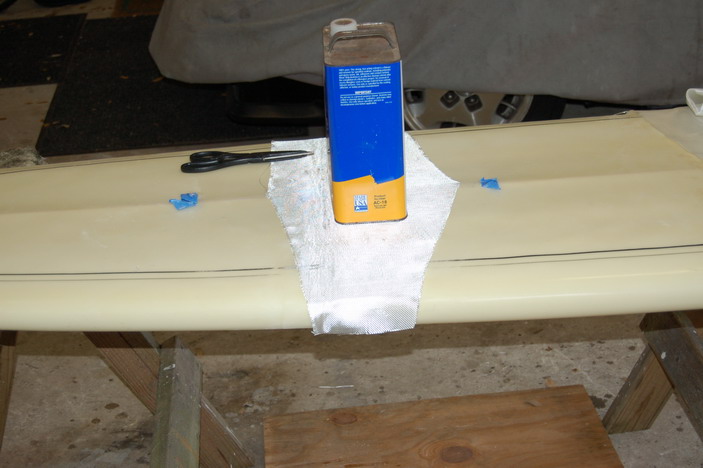
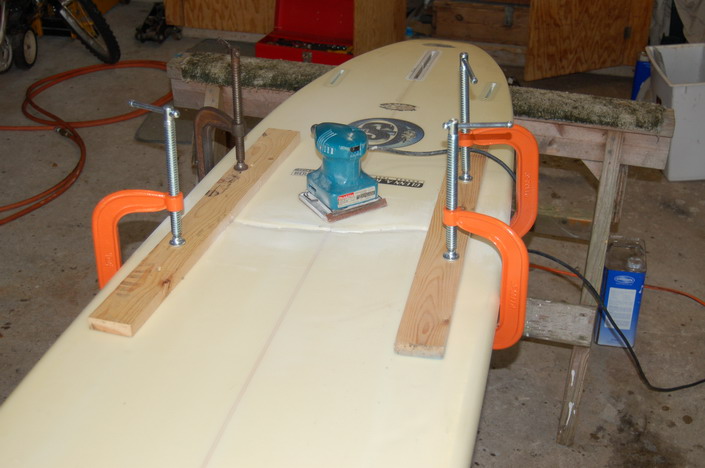
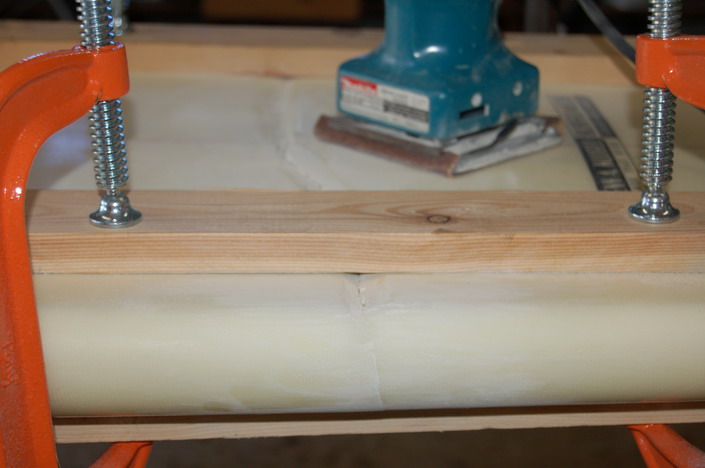
After any necessary trimming to assure that the two sections will align easily and quickly, loosen the clamps and move them out of the way just enough to provide room for sanding. I used a power sander with 60 grit dry paper. Sanding can be done by hand, but it's a lot quicker and easier with a power sander. Take down any high edges and rough up the surface several inches to each side of the break in order to provide a good grip for the patch and filler that will be applied in the next step. Be sure to sand any low areas in the break so that the filler will have a good grip. Don't oversand and eat all the way through the surface laminate except for high spots that need to be taken down.


After sanding any areas that are going to be glassed over or filled, remove the clamps and splints (the initial alignment is just a dry run). With this board, since the deck was still intact, the board's own weight held it together while suspended between two saw-horses. If the board is broken all the way through, it will be easier to perform the attachment steps with the board secured in an upright position or supported by a platform placed under the surfboard.

It is now time to mix up some resin combined with micro-balloons to make a thick paste ("glue"). Micro-balloons are a white powder that is mixed a little at a time into catalyzed resin until a desired paste-like thickness is achieved. We want to make the mix pretty thick, but still be able to pour it. I always use epoxy resin for this since it gives me lots of working time and bonds extremely well. Note that you can use epoxy resin on a polyester board, but you cannot use polyester on an epoxy board. The solvents in polyester resin will dissolve the polystyrene foam core used for most epoxy boards. If you are using polyester resin for the attachment step, you will need to do some trial mixes to determine your working time for the current temperature. You will also need to hustle from the time you mix the catalyst until you clamp the two sections together for final alignment since polyester resin usually gels pretty quickly.

For this board, I simply pressed up from the bottom of the board to open up a gap, and poured a full 6 ounce cup of "glue" mixture into the crack. When I let the board back down, the crack closed and the excess mix oozed up. I just let it form a bead since it is easy to sand off the excess after it hardens. I think epoxy is easier to work with than polyester because you don't have to rush. I use a medium speed catalyst that gives me at least 25 minutes of working time after mixing the resin and catalyst. Epoxy requires a longer wait between each step than does polyester, since it sets up slowly. If working with the board in a standup position, which is easier when the two sections are totally separated, the glue mix is going to run down over the board. Thus, it saves some work to mask off below the break, and wipe off excess glue mix after the two sections are joined together.


After pouring in the glue mix, I replaced the splints and clamps and checked carefully to make sure the alignment was perfect. The clamps are placed close to the break with the handles spread such that there is room to apply a patch to the rails. This glue-it-together attachment step is the most critical step, and is why we did a dry run on the alignment earlier. If you made sure the alignment would go well before you applied the glue, the actual attachment should go smoothly.


I almost always use temporary rail patches. For these patches, I apply two layers of heavy cloth (6 oz or heavier), with the first layer about 1 inch wide and the 2nd layer about 2 inches wide. These patches should wrap the rails and extend about an inch inboard on both the deck and bottom. Don't worry if there are air bubbles under the patch. The sole purpose of these patches is to provide strength to hold your hard fought alignment in place during subsequent handling of the board. For short boards, or longboards that fit back together very well, the temporary patches may be over-kill. However, for the small amount of extra work, I would rather not take the chance on the board separating while I move it around my shop prior to applying the final laminations. I usually sand off most or all of these temporary patches just before laying the final cloth.

If any air bubbles have formed along the surface of the crack, pour some more filler mix. It is better to have the filler too high than too low, but don't worry too much at this phase since chances are high that a second application of filler will be needed to fill all the air bubbles and low areas before final lamination. It would be a good idea to use wax paper under the wood splints. I always intend to do this, but usually forget. A little side swipe with a hammer will loosen the splints, but they would slip right off with the use of wax paper.

That's it for the day! Let it cure over-night. Even if you are using polyester resin, which sets up a lot faster than epoxy, it is still best to let it cure at this stage. If you achieved a perfect alignment, congratulate yourself. The rest of the repair is going to be easy compared to the alignment process. This board was relatively easy to align. With some breaks, about the only good contact that holds the two parts together will be the temporary rail patches. In such cases, one side may need to be laminated or taped up really good before the filler is poured into the crack. Since filler ads weight, and too much weight will ruin a board, for really bad breaks read about the use of pour-foam on one of my other surfboard repair pages. Click here.


Here it is after curing overnight. I waited until the filler was set firm, but not totally set, to remove the clamps and knock off the splints since I knew they wouldn't come off easily. If I had used wax paper, I would have left the clamps and splints on over night. Since some large chunks of filler came off with the splints, I mixed and poured some more filler to fill the gaps. In the top picture, sighting along the rail, you can see that the alignment came out just fine. I also built up the filler a little too high. I should have squeezied it down just after I finished attaching the clamps. Next we will do some serious sanding.


The blue tape is to mark the area I need to sand. I sanded off the built up filler with 60 grit paper on a small power sanded. It took about 20 minutes to level out the bottom. A circular sander is much faster, but also much easier to grind a divot in the board and it throws dust all over the place. After sanding down the high spots, there may be some air bubbles and low spots that need additional filler. Sometimes it takes several repeats of filling and sanding to get the surface just right. Repeat the fill and sand process until a straight edge passed over the break indicates all the low spots have been filled. Do not expect the final lamination to fill any lows. The final lamination will pretty much mirror the surface you apply it to, and any air bubbles in the filler are going to cause bubbles under the cloth that may show through. Take your time and get it the way you want it before you laminate. Note that I have sanded down the temporary rail patches because I am through moving the board around and am getting ready to apply the final lamination in a few minutes.

For this break, I am going to laminate the bottom first. Some repair guides will tell you to do the top first. I don't think it matters beans which you do first. Also, most repair guides will tell you to use two layers of rectangular shaped cloth 6" and 8" wide on the bottom, and two layers, 10" and 12" wide on the deck. I do it just a little bit differently as you will see below.


Instead of the "conventional" double banded patch, I am going to apply what I call a "double diamond" patch. It's a little more work, but it cuts down a little on the weight and helps to preserve just a little bit more of the boards natural flex. It simply involves trimming excess cloth to give a diamond shaped pattern. Set a weight on the cloth while you cut to keep it from sliding around, and use sharp sissors. With either patch pattern, I have never had a board break twice in the same place. However, I have had several double banded patches break just fore or aft of the patch, and my only broken board that never broke a second time was repaired using a double diamond patch. You can fix your board either way, but for this board I am going to use the double diamond. I am using two layers of 6 oz cloth, with the top layer at least one inch larger on all edges than the bottom layer. The edges overlap the rails and extend about an inch inboard on the bottom. If the break was straight across the board, I would have made the diamond more pronounced, but in this case I had to make the edges pretty wide to maintain a symmetrical pattern. (If it doesn't look symmetrical, it is due to the distortion from the camera's wide-angle lens).

Some guides will also tell you to use doweling or splice the broken stringer. I have done both in the past. Doweling is for the birds. It is hard enough trying to align two sections as it is. The dowels just complicate the process greatly. Splicing the stringer has merits, and I have done that many times. It involves cutting a thin slot beside the stringer, fore and aft of the break, and inserting a splint saturated with resin so it bonds with the existing stringer and spans the break. The remaining void is filled with resin or filler mix. However, since I have never had a board break twice in the same place, with or without a spliced stringer, I am not going to splice the stringer for this board. The two sections of this board fit back together very snugly and the added lamination is going to make this section stronger than it was originally. If it breaks again, I doubt that it will be here. By the way, you can cut a board's laminate with a razor knife, but a small circular saw bit on a Dremel tool or on a small drill works much better. Be sure to wear goggles while you cut with either tool.


Applying the resin is pretty easy, especially with epoxy due to the long working time. For this patch I mixed about half of small paper cup (3 tablespoons of resin and 1 of catalyst). I poured half of the mix around one side of the board and worked it until it saturated the cloth. I used a small paint brush to do the edges and underside. Then I repeated the process on the other side. After the cloth was fully saturated, I gently worked out the excess resin. The less resin you use, the less weight you add to the board. The squeezy causes the cloth to bond to the board much better than just painting the resin into the cloth with a paint brush.


Applying the resin took perhaps five minutes. Check carefully for any air bubbles or dry sections in the cloth, and add extra resin if needed. Since I am using a slow cure epoxy, I have to wait at least 4 to 5 hours before I can do the other side. With polyester, you may be able to proceed with the other side in an hour or two. If you are using polyester resin, you want to use laminating resin for the cloth layup. Finishing resin is just lamianting resin with a wax agent added so that the wax floats to the surface and causes the surface to set hard so it can be sanded. Laminating resin sets up with a tacky surface that is very difficult to sand. Epoxy resin sets with a hard surface that can be sanded.

Ooops... another mistake. Perhaps if you fix boards every day, you won't make any mistakes. But if this is your first time, or you just fix a few boards a year like I do, you'll make some mistakes. After I laminated the bottom and started preparing the deck, I noticed moisture seeping up out of the cracks near the rails. STOP! Got to get the water out of there! I punched several holes in the deck with a screwdriver, poked in paper towels, and suspended the board deck down. The wicker effect of the paper towels draws the water out. But it is slow going. I replaced the paper towels each morning and night. After four days the towels were still sucking out moisture. When the paper towels stay dry for a day, that's about all the moisture you are going to get out of the board. It is better to let it dry out fully in the first step while the board is still open, but I often get in too much of a hurry and end up paying the consequences. By the way, the paper towel trick is also a good way to remove moisture from a rail ding that stayed in the water too long.


Approximately a week later, the paper towels quit sucking out water, so I filled the holes with filler and laid up the deck. Again, I used 2 layers of 6 oz cloth and covered an area slightly larger that covered by the bottom patch. The idea is to distribute the stress, so that hopefully the board can still flex without snapping just fore or aft of the patched area. The top picture shows the first layer of cloth and the bottom picture shows the deck after the resin had set.


After laying the cloth and allowing it to cure, sand down any high spots and ridges and tape off an area about half an inch beyond the edges of the cloth. Mix up enough resin and paint the taped area well. Brush in the resin with long strokes, first fore to aft, then at 45 degree angles to make sure the resin has good even coverage over the entire patch. As soon as all the air bubbles are worked out, pull the tape from the top, but leave the drip edge tape on the rails until the resin starts to gel, so that it won't run down the edge and bead on the bottom of the board.


After one side has cured, turn the board over and repeat the process. In the above picture, the deck has just been painted with resin and the taped pulled. Note that the tape hangs so that excess resin will just drip off the edge of the tape and not run down to the bottom side of the board. If you are using polyester resin, be sure to use sanding (finishing) resin which has a wax additive. You can see how glossy the finish is. Next comes lots of light sanding to blend in the edges, smooth off any bumps and take off the gloss so it blends with the sanded board finish.

And here it is on December 5, 2006, all waxed up and already tested twice in small waves. It doesn't look very nice, but I can not feel any difference in the water. It now weighs almost 15 lbs without the fin. I added just under 1 lb with the patch. That red fin is a huge 10" fin from my 10 foot board and is a little too big for a light 9'6" board, but it sure doesn't slide sideways very much. I could dust paint with some antique white and clear coat over it to hide the patch, but why bother. You can see the patch, but after sanding with 100 dry (power sander), then 220 wet, then 320 wet, you can't feel the patch with your hand. If it breaks again, I'll update this page. This is now back to being my number-one board since it is so easy to ride and several pounds lighter than my broken-in-half-five-times board that I rode while this one was down.


CFLsurf Home Page || About this Site || Photo Galleries || Surf the Web || Return to Repair Series Page